Showing posts with label how to. Show all posts

Friday, January 31, 2014

All About Pinterest Part 2!


Welcome to part 2 of our All About Pinterest series!  In part 1 we discussed why Pinterest is beneficial to bloggers, how to get started, how to pin new content and quick tips for Pinterest-blog harmony.  Click here to check out Part 1!

The next step after pinning content is the repin.

So let's talk about re-pinning.  Besides pinning from your own blog or other websites you like, you can also repin from your news feed.  Repinning is a very easy way to save pins you love, but you should keep in mind that not all pins are what they appear to be!  Sometimes you repin something that looks really great, like a recipe or an outfit or a how to.  Later you go back to check out that pin only to find the site is spam, or has no directions, just pictures.  Here are some tips from our Pinterest expert, Ellie, on how to avoid "repin disappointment":

1. Always click on the pin! Sometimes pages aren’t there anymore, the link is wrong, or it simply isn’t as described. Just take two seconds, click, and if it works and it looks like something you want to hang on to, REPIN.

2. If it is a recipe, click on the pin and check the COMMENTS section of the post. If there are no comments, then it is a gamble but usually there are and they can be super helpful and honest. If 20 people write and say they just can’t get that no-knead bread to rise, chances are it is not a great recipe. There may also be tips on how to make the recipe better or more healthy so it is a win-win.

3. If it is something you would like to buy, click the link to see if it goes to a store, if it is still available, and if it is in your price range. Sometimes I will just repin something because I like the photo or just want something similar BUT if it is something I am pinning because I would really like to own that exact thing, I click first.

Quick and easy- how to repin:


Step 1: Click the pin you want to repin from your news feed.  It will open up in this screen and you click "Pin It."  There is also an option to "like" a pin, but that does not allow you to organize it in your boards, nor does it show up in your feed.  Therefore, the pin itself will not get more traffic, which is counterproductive if you are trying to help a friend out by repinning their content.


Step 2:  Choose the board you want your pin to go to.  Then check the description to see if it says something helpful to you.  You can change the original description if you want.  Then, click Pin It, and there you have it!

Now we know all the basic things to do on Pinterest so let's get a little more advanced!

How to add the pin it button to your blog.

This is different than the pin it button you added to your web tool bar!  Adding the pin it button to your blog allows people to pin directly from your blog, even if they don't have the pin it button in their own toolbar.  This can be beneficial to you for getting more pins to your blog!

The most simple way to add this is to use the Pinterest Widget Builder. Which looks like this:


As you can see, from the widget builder screen I can build a pin it button, follow button and profile widgets.  The pin, profile and board widgets are great to show off a pin or board in your blog posts or you can add them to your sidebar to show off your profile!

Here is another tutorial on how to add a pin it button to your blog posts.  This one discusses how to add coding to your blog so the pin it button shows up in every post.  There are several other tutorials out there, let us know if you find a good one that worked for you!  Just in case that one doesn't work for you here is another option!  This blog also reminds us to back up our blogs before making any changes to our HTML codes- great tip!

If you don't understand any of this or don't want to deal with HTML coding, you can also hire a blog designer to add a custom pin button for you!  Generally (from what I've seen) they charge $15-$25 to add a custom pin it button to a blogger blog.

Pinterest Reminders for good pins:

1. Make sure you blog post has clear, original images or graphics that are attractive.

2. Add a description that is catchy, relevant and useful.

3. Make sure your link works!  Be sure to link directly to the post, not the main URL of your blog.  If people click through from Pinterest to your blog, they want to see the content they are clicking on from Pinterest, not just your blog in general.

Last but not least, I will leave you with this infographic with some helpful Pinterest statistics:


Happy Pinning Everyone!! 

Did you enjoy our Pinterest series? Please let us know, if more members are interested we can add to this series in the future!

Connect with us!
Bloglovin //Twitter //Pinterest //Facebook

Thursday, January 30, 2014

All About Pinterest Part 1: Why Use Pinterest & How to Get Started

On Monday we started our new hop which is a Pinterest link up.  You might be wondering why we started this up, and how Pinterest can be beneficial to you!  We hope to answer all your questions and more in this two part series All About Pinterest!


Why should I use Pinterest?

It's pretty straightforward: Pinterest is one of the top ways to drive traffic to your blog.  Besides perusing for recipes, home decor and cute puppy pictures there are tons of great ideas on there- and one (or more) of those ideas can, and should, be yours!  Pins from your blog post drive traffic directly to your blog and give you more exposure.  Hopefully, people coming from Pinterest like what they see in that post and stick around for more.

While looking at my blog statistics I see that Pinterest is second in the list of referring sites.  That's second only to google searches.  It is also fourth on the list of referring sites after bloglovin.  And I don't even have very many pins connected to my blog, so you can just imagine how much higher on the list it could be, had I pinned more of my posts!

So let's talk about how to get started!

Setting up your account is easy, just sign in using Facebook, Twitter or your email.  Follow the directions to set you account up.


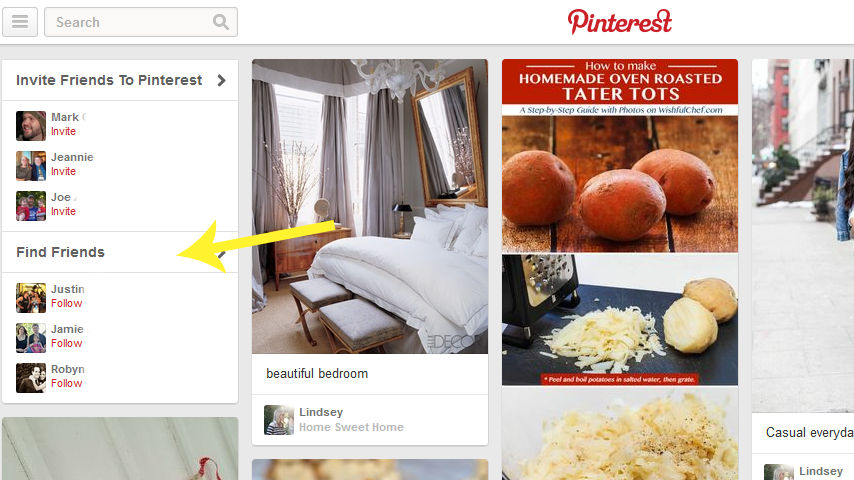
The next step is to follow follow follow!  Pinterest suggests people you may know through the social media sites you connected with, as you see in the example above.  So, if you connected to your Twitter and Facebook, you will see suggestions of people you are friends with on those sites. You can also invite friends who don't have accounts set up, but are your friend on Facebook or Twitter.  

You can also go to blogs you love and find their pinterest follow link, or just search for topics of interest in the search bar and follow new people that way!  Of course you could also go to a Pinterest link up and find new people to follow in the link up as well.

There are two ways to follow people.  In the left picture above you see Ellie's account and the "Follow All" button.  Simply click to follow all her boards.  That means you will see all her new pins in your feed and will also automatically follow any new boards she creates.  You can also follow only specific boards from people's accounts, if only those are of interest to you.  In the example to the right, I am choosing to only follow her "color inspiration" board.  However, for maximum pinterest activity, it is always nice to follow all the boards.

The next thing you should do is to create and organize your boards.  Boards are groups of pins organized by a certain topic.  For example:


In this example we see Rachel has 52 boards and these are the four at the top.  When you pin or repin something you choose which board to place that pin into, so you can keep all your pins organized.  You can create new boards using the "create a board" button to the left, or when you pin a new pin you can create a new board to fit that pin right in that screen!

So now we know the why to use Pinterest and how to set up your account.  But how can you make Pinterest beneficial to your blog?  Get started by pinning things from your blog!


There are several ways to add new pins, besides repinning pins from your news feed.  You can add your own pins in the following ways- click the red + button next to your account name.  You can upload a pin or add from a website here.  But, as the picture above shows, the best way to add new pins is by installing the "Pin It" button to your web tool bar.  Simply click the link "The Pin It Button" and then follow the instructions to install it to your browser tool bar.

Once that is installed, you can pin from any site!  When you see something you like, or want to share from your own blog just click the pin it button, choose the picture you want associated with that link and the board you want to pin it to and then pin it!

Quick Tips for Pinterest-Blog Harmony:
 These tips are good to keep in mind when you are linking up with Pinterest hops, like ours, as well!

Tip 1: Be sure to have an attractive image in your post if you want people to pin it!  Pinterest is visual, so if your post is just words with no pictures, it is very unlikely to get pinned.  (if you link up to a pin party like our hop, and your post does not have a picture or graphic of some sort, it will not get pinned)

Tip 2:  Add a short description with key words that will direct people to your pin when they search.  Hash-tags are not necessary.  A pin with a good description will rate high on the search list and get more traffic.  For example: "5 tips for traveling with kids" instead of "Our family trip to the beach."

Tip 3: When linking up to pin parties or hops, be sure to link up to the exact post you want pinned, not just your blog URL.  If you link up to your blog, the host of the party will not know which post you want pinned, and you will likely get no pins from that party because of it.

I hope All About Pinterest Part 1 was helpful to you!  

Stay tuned tomorrow for more advanced Pinterest tips including: adding the pin it button to your blog posts, how to properly repin, special tips from pinning expert Ellie and more!


Connect with us!
Bloglovin //Twitter //Pinterest //Facebook

Thursday, January 23, 2014

Blogging Tips: How to Link Up with a Blog Hop

A few of our members have requested this post, which I think will also be a great read for any new bloggers as well!

Many people might not know what the terms "blog hop" or "link up" mean, especially when they are new to blogging or have never participated in these types of things before!  Both terms refer to generally the same thing- a list of blogs or other websites that you can add your link to as well.  Often times a "hop" refers to a link up where you are supposed to put your link and then hop along to the next persons link on the list, therefore going from blog to blog.

Links ups don't have to just be for a blog post, they can also be for a social media page such as pinterest, twitter or Facebook.  Just be sure to read the directions on the blog where the link up is hosted so you know exactly what to do!

Here is how to link up:


 In this example I am showing our Facebook link up from this past week.  To add your link, scroll down and find where it says "Click here to enter".  Please note that there are several different services bloggers can use to create a link up list, so the screen may look a little different.  Some of them say "Add your link" or "click here to add link" or the like.


 Next you will see a screen similar to this.  Add your title, link, email and name.  Make sure you add the correct link for that link up!  If the link up is for Facebook, for example, be sure to add the URL to your Facebook page.  If the link up is for a specific type of blog post, be sure to add the URL to that blog post, not just your mail blog page.

 You'll notice here that this link up is requiring an email address.  Some link ups require an email AND name, some only email or neither.  We require an email for two reasons: to prevent spam link ups and in case we need to contact you about your link for any reason.  Generally, only the owner of the link up can see your email address, it is not publicly displayed.


Last but not least is Step 4.  Not all link ups have this step, but a lot of them do!  This is the picture step.  You can choose to add a picture from the web link you linked up with or from your computer or use the generic picture provided by the linky tools website.  Above I have selected "Let me crop my own image" just in case I want to crop it after I choose it!  You can also choose auto crop and they will just crop it for you, but it might not look exactly how you'd like.

If you link up with your blog or blog post it is very easy to choose a picture from that blog.  If you link up to Facebook, Twitter, Pinterest, Bloglovin or Instagram, I would recommend choosing the "File from your computer" option for your picture.  Otherwise the picture options will be slim and/or very blurry!

Either way, you just chose the picture you want to use, crop it if you'd like and then press "Enter your link."

Again, this example is using the Linky Tools service to link up, which is what Northeast Bloggers uses.  However, other blogs may use different link up services, so just be sure to read the directions if the screen looks different!

I hope this helped those of you who were questioning how to join our link ups/hops and will encourage you to participate in more of them in the future!

Connect with us!
BloglovinTwitterEmailRSSPinterestFacebook

Friday, October 18, 2013

Friday Five: 5 Free Tech Tools for Bloggers!

Welcome to Friday Five!   

This week we have a really awesome infogram from Northeast blogger Julienne!


Connect with us!
BloglovinTwitterEmailRSSPinterestFacebook

Thursday, September 5, 2013

Guest Post: How to Send Blog Post in HTML

Today's guest post comes from Jacquelyn over at the blog justjacq.  She gives us a great tutorial on how to send guest post over in html format!
 ___________________________________________________________
Okay, maybe you know this and if you do, just move right along. I just figured this out a few months ago. Go ahead, point and laugh. 

When I first started guest posting on other blogs I'd send over a freaking word document with [insert photo1 here] [insert photo2 here]. Ummmm I was so annoying! I apologize profusely to all those bloggers. But I just didn't know the proper way to send a guest post and no one ever corrected me. 

Then one day someone asked for the html of the post. Excuse Moi? 

So being the smarty pants that I am I put on my thinking cap and figured out how to do it. 

Now that I'm blog famous and have people guest post on here, I thought it would be nice to share how to send html. I've sent instructions to a few people so I figured this is something a few people can use. Feel free to share this to anyone who doesn't know! 

Okay, I use Wordpress so I tweeted asking for a Blogger blogger to help me out for the Blogger users. Then I got impatient waiting for an answer so I texted my blog bff and asked her if she used Blogger or wordpress. 

Wordpress 1. Write your post in the Text tab (click on the image below to make it bigger and easier to see!) 

text tab

2. Include the images like you would if you were writing the post for yourself. 

 3. Copy everything, paste it in an email, and send it to the person! Hey this is Kaara, and I'm the bff Blogger blogger Jacq is talking about... Here's my instructions for sending your Blogger HTML to guest post on someone's blog: 

Blogger 1. Write your post including pictures under the COMPOSE tab. (It should automatically already open this way when you go to write a new post)
blogger text tab

2. Switch it over to HTML in the upper left corner (next to compose) once you're finished writing your post. 

3. Copy it in HTML and paste it into an email. That's it. Seriously. Now what does that person do with the html? If they are on Wordpress they go to their text tab and paste it in exactly how you sent it. The images will appear like magic when it publishes! If they are on Blogger, paste it into a new post under the HTML tab then switch it over to COMPOSE with one simple click! and voila! Magic. 

Follow Jacq on Bloglovin', Twitter, Facebook, Pinterest, and Instagram for more Blogging Tutorials!

Connect with us!
BloglovinTwitterEmailRSSPinterestFacebook

Today's guest post comes from Jacquelyn of the blog justjacq. Jacquelyn is a NE blogger from Pennsylvania who loves making list, hand written notes and hopes to one day become a yoga instructor.